
In this blog post we'll look at the four (4) main ways in which our customers Install LED neon signs when renovating their spaces or moving into a new one.
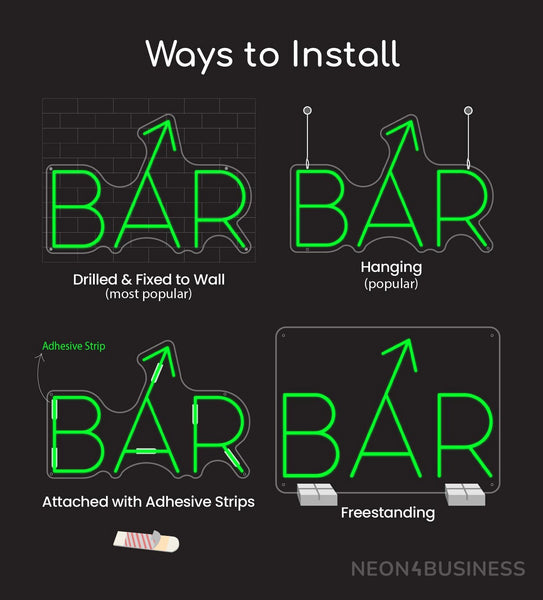
DRILLING
The large majority of our customers drill their signs to a wall.
This 4-5 minute video shows an example of an LED neon sign being drilled to an interior wall using the types of accessories that ship with your product.

Please note, unless you ask us otherwise, all LED neon signs come with holes that are pre-drilled into the acrylic backing. These holes are located in carefully calculated locations across the backboard to ensure the weight of the product is equally distributed across all points, regardless of your design.

HANGING
Other customers - local shops and local businesses - sometimes want to display their signs from their window.. for this type of set up they normally hang the sign on the inside of the shop, facing out. They normally insert one or two tiny pins into the structure just above the window, and then using the hanging chains that ship with your product they will connect the sign so that it hangs just at the right height. The hanging chains have a simple mechanism that allows you to adjust the length of each chain.

Just as with the example above, note that all signs come with holes that are pre-drilled into the acrylic backing. These holes are located in carefully calculated locations across the backboard to ensure the weight of the product is equally distributed across all points, regardless of your design.
FREESTANDING
Other customers might need a slightly more portable sign to use more flexibly, for example at a market, at an exhibition or an event, so they might request a freestanding sign. The following photo is just one such example of the support mechanism we use, but the actual block, support, piece used will depend on the shape and size of your sign, we'll of course make sure you're getting the best stability.

Most customers mention to us that MAYBE ONE DAY after having used their freestanding sign at events, markets, etc, one day they might want to install it in their office or home (by drilling it to a wall or hanging it). Because of popular demand, we tend to also pre-drill the holes into your sign's acrylic backboard (and send you some additional accessories) in case that in a future day you indeed choose to re-use the sign drilling or hanging it.
ADHESIVE STRIPS
A small number of customers might have a window, a mirror or a very smooth metallic-like wall surface in mind; when attaching the sign to these types of smooth, clean surfaces, only then would we recommend installing it by attaching with adhesive strips (link).

For more installation details, check out our full Installation Guide
OTHER SUGGESTED BLOGS & PAGES
People who read this blog also found these blog posts useful:
"Shape of your Acrylic Backing"
"Culture, Personality & Character"
"Using LED signs to Localise the Brand"
"Implementing Sustainable Solutions for Interiors"
"Our Team"